See the Quickstart Tutorial here:
Entering Notes
There are a number of methods for getting notes into Fender Notion, including playing in real time, handwriting, importing MusicXML, or simply tapping notes in. The note entry method you choose will depend on not just your preference, but also on the context — fast, florid passages are quicker and more accurately entered with step-time, for example. It will also depend on what peripherals you might have — for example, you can draw with an Apple Pencil, enter keyboard shortcuts with an attached keyboard, or play note pitches with a MIDI Bluetooth piano keyboard.
-
Tap (or click) notes in.
This is the easiest way to get started entering notes.
-
Tap the Note Tool in the tool palette.
-
Tap in the score by hand where you want to enter the note.
-
That’s it!
Changing Durations
-
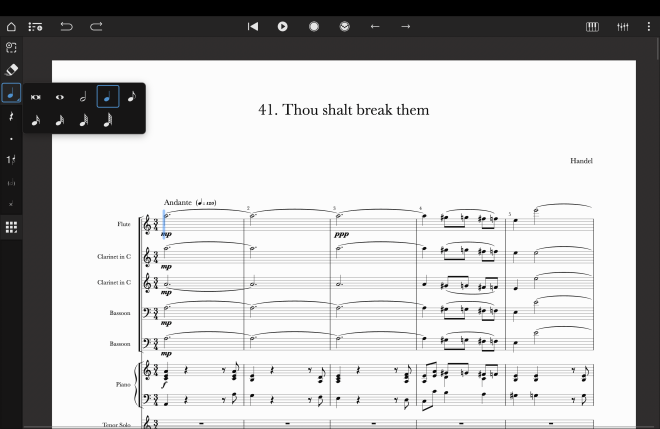
Tap the Note Tool once to select the currently-shown duration.
-
Tap again to show all options to select a different duration.
-
To quickly change duration in a single gesture, press+swipe the Note Tool to open it, then release on the desired duration. This works whether you are tapping a touchscreen or clicking with a mouse.
-
If you have an attached keyboard (either wired or Bluetooth), then you can also use Keyboard shortcuts to change the note duration.
Changing Pitch when Entering Notes
-
On touchscreens, a long press on the score will display a crosshair under your finger. You can now accurately drag up and down to get the pitch you desire before letting go to enter the note.
-
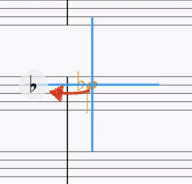
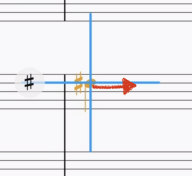
During this long press, you can also drag slightly left or right — this will add an accidental to your note, sharpening or flattening it accordingly.
-
If you are entering drum notes on a drumset staff, the drum label will also appear under your finger with the crosshairs (e.g. “Tom 14”) — you can also drag slightly left or right which will add a variation and change the notehead or stem. (e.g. “e.g. Tom 14 Rimshot”)
Enter a Note on Tablature
-
Select the duration you want, then tap on the string required.
-
A text box will appear and if you’re using a touchscreen, the on-screen keyboard will appear.
-
Enter the fret number and tap Enter.
Enter a Rest
-
Select a duration with the Note Tool.
-
Tap the rest icon.
-
To go back to note entry, tap the rest icon again or the Note Tool.
-
Rests can also be selected with keyboard shortcuts — the shortcut for the duration simply toggles between Note and Rest as you repeatedly press it.
-
You also change existing notes to rests and vice versa — just select the passage or item(s) and then select Notes>Toggle Note or Rest. Alternatively, simply tap Shift+Backspace.
Step Entry
Step Entry allows you to enter notes step by step, one after the other, in arbitrary time. The rhythmic duration is entered either by selecting from the Note Tool in the palette or with keyboard shortcuts (if you have a keyboard connected). There are then various ways of entering the pitch:
Step Entry with an Onscreen Instrument
-
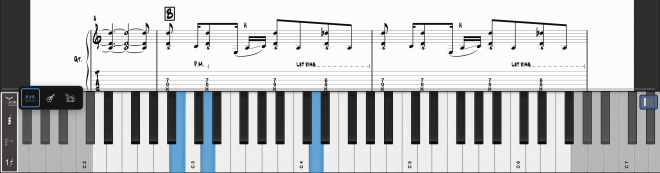
Tap the onscreen instrument piano icon in the top right corner.
-
When the icon is blue, long press or swipe the icon to quickly change from piano keyboard to either a guitar fretboard or drum pads. (You can also change the shown instrument by swiping on the Step Entry icon on the instrument itself — see below).
-
Tap either of the Step Entry icons — there is one in the main transport area at the top of the screen in the middle, and one at the bottom, at the left of the onscreen instrument.
-
Select the desired duration from the Note Tool or with a keyboard shortcut.
-
Tap the onscreen instrument to enter the notes.
-
To enter a chord rather than single notes, tap the chord icon in the instrument then build the chord in the instrument. Tap the right arrow icon in the transport to enter.
-
To repeat the previously entered chord, tap the chord icon with an arrow — this will be able to be selected once the first chord has been entered.
-
To enter a rest during Step Time, select the desired duration, then either tap the rest icon in the palette or use the keyboard shortcut; Space Bar.
-
To add a tie during Step Time, enter the first note of the tie, then either tap the Tie Tool in the palette, or use the keyboard shortcut; T . Then enter the second note of the tie.
-
To navigate left and right, use the right and left arrow icons in the transport area or use the navigation keyboard shortcuts.
-
If you are entering notes for a transposing instrument into a transposing score, you can choose to play the sounding pitch (transposing yourself), or let Fender Notion transpose for you. Go to Record Setup>Transpose Input.
Piano Keyboard
-
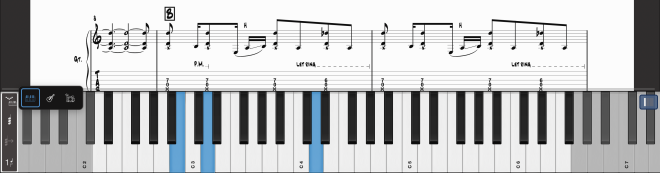
To shift octaves, either tap the +/- icons, or swipe the keyboard at the top of the keys. A blue swipe area will then appear which will allow you to drag the keyboard left and right, even while you are using it for real-time recording (see below).
-
You can adjust the width of the keys to suit your screen size and personal preference. There are three different widths — tap the width icon to toggle between them.
Guitar Fretboard
-
To shift the fretboard, tap the +/- icons.
Drum Pads
-
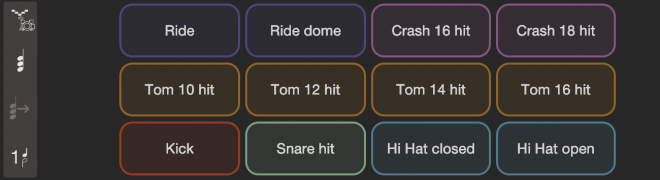
A set of 12 colour-coded Drum Pads are available when a drum instrument is selected. Tap the Drum Pads to enter — the respective noteheads and e.g. tremolos will be added automatically.
-
To change which drums are shown on the pads, right click or long press on a pad, and make your selection. Scroll down the list to select ‘Reset Pads’ to go back to the default.
-
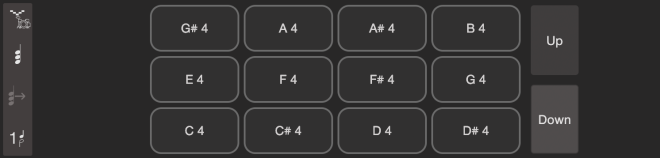
If a pitched instrument is selected, the Drum Pads will show pitches and their octaves instead (e.g. A4) - these can be entered by tapping. To change the octave, tap the Up / Down Pads.
Step Entry with a MIDI instrument
-
Connect your MIDI instrument to your device, either wired or via Bluetooth.
-
In Fender Notion, go to the Application Menu>Record Setup, and select your MIDI instrument from the drop-down list.
-
Tap the Step Entry icons at the top of the screen in the transport area.
-
Select the desired duration from the Note Tool or with a keyboard shortcut.
-
Enter your notes / chords with the attached keyboard.
-
To enter a rest during Step Time, select the desired duration, then either tap the rest icon in the palette or use the keyboard shortcut; Space bar.
-
To add a tie during Step Time, enter the first note of the tie, then either tap the Tie Tool in the palette, or use the keyboard shortcut; T. Then enter the second note of the tie.
-
To navigate left and right, use the right and left arrow icons in the transport area or use the navigation keyboard shortcuts.
-
If you are entering notes for a transposing instrument into a transposing score, you can choose to play the sounding pitch (transposing yourself), or let Fender Notion transpose for you. Go to Record Setup>Transpose Input.
Real Time Recording
Real time recording is possible with Fender Notion, allowing you to enter notes and durations while playing to a metronome click. This method is best for simple music — if a passage is intricate, then change the metronome mark to reduce the tempo for input, or use a different note entry method, such as Step Entry. You can use either the onscreen instruments or an attached MIDI instrument for entry — hit the record button in the transport and play. Once you have stopped, Fender Notion will analyse your performance and turn it into notation.
Setting Record Options
-
Go to the Application Menu>Record Options.
-
Select the connected MIDI instrument if desired.
-
Switch metronome click on or off — this is for both recording and playback.
-
Select how many bars Fender Notion will count in before you start recording.
-
Select ‘Transpose Input’ to adjust whether Fender Notion should transpose your MIDI instrument on note entry.
-
The next options determine how Fender Notion analyzes your performance. By default this is set up to optimize MIDI keyboard entry — tap the Presets button to switch between MIDI Guitar and MIDI keyboard.
-
Min Velocity sets the minimum MIDI velocity of a note from 1 to 127. Fender Notion will disregard notes under the level set here.
-
Min Duration sets the minimum duration in milliseconds of a note. Fender Notion will disregard notes under the duration set.
-
Split Point: If you are entering notes on a Grand Staff (where a single instrument has two staves, one for each hand e.g. piano, harp, marimba), you can set the split point at which Fender Notion will send and notate notes to either hand. This is by default set for piano at C4, middle C.
-
Tuplets determine whether Fender Notion should use tuplets in its analysis (tuplets can mean not just triplet notes, but other groups too).
-
Multi-channel guitar: if you have a multi-channel MIDI guitar controller, this tells Fender Notion to listen for one channel per string.
-
Default metronome click duration
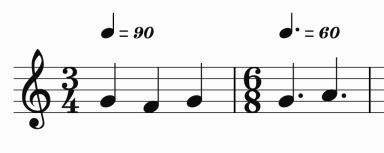
Fender Notion will follow the printed metronome mark when playing the metronome click. This is important to remember, especially if there’s a change of time signature later in the piece. For example, a piece could start at quarter note = 90 in 3/4, but then later change to 6/8. Unless a new metronome mark is added, then the metronome will continue clicking at 3x quarter notes per measure. In this case, a new metronome mark should be added at the change of time signature, to dotted quarter note = 60 — you will then hear two clicks per measure as expected.
Handwriting Recognition
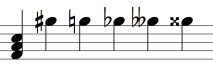
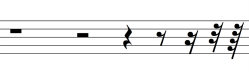
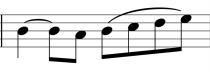
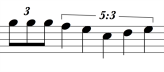
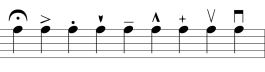
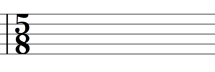
You can also use your own handwriting as a note entry tool. Fender Notion’s handwriting engine is powered by MyScript™ which has analyzed thousands of different music handwriting styles — this means there are no custom gestures to learn nor does the software need to “learn” your own personal style. Fender Notion can convert notes, rests, chords, articulations, measure lines, accidentals, time signatures, measure lines, ledger lines, slurs, ties, clefs. See below for a full diagram of items. Handwriting is supported on all platforms (Windows, macOS, iOS, Android) and all devices (phone, tablet, computer) and you can use a stylus or even your finger. Pressure sensitivity is also supported for active styli. If you are not using Fender Notion on a touchscreen, you can optionally use a graphics tablet for handwriting too.
Handwriting recognition is available on standard 5-line notation staves (i.e. not single-line percussion staves nor tablature) — it is a paid feature unlockable via the in-app purchase, or by signing in with your Fender Studio Pro+ account.
Handwriting With an Active Stylus (e.g. Apple Pencil / Microsoft Surface Pen)
Fender Notion can automatically detect the difference between an active stylus and a finger.
-
If you are using this type of stylus, then by default, handwriting is automatically engaged for your stylus leaving your finger free for normal note input and score navigation.
-
You can still opt to manually switch between modes - go to Application Menu>Options and select Pencil Handwriting ‘Off’. You can then manually switch modes by using the Handwriting Tool icon which is visible in the Extended Palette view (Application Menu>Options>Extended Palette).
-
Pressure sensitivity is enabled for these type of styli, meaning that as you draw, the line thickness varies depending on how hard you press. Although this information is ultimately discarded on conversion, drawing feels much more natural, and is also more accurate.
-
With an Apple Pencil 2nd generation, you can double tap outside of a measure to force the recognition process, instead of waiting for the fixed length timer.
-
With an active stylus you can also ‘lasso’ select whilst in handwriting mode, by drawing around multiple objects. Fender Notion will automatically detect freehand selection compared to handwritten notation, and switch mode accordingly.
Handwriting with Finger / Standard Stylus
-
Tap the Handwriting Tool in the palette (the ‘pencil’ icon).
-
You can now draw into your score.
-
After a short period of inactivity, Fender Notion will analyze your handwriting and turn it into digital notation.
-
To navigate or zoom your score whilst in Handwriting mode without drawing unwanted lines, drag and pinch using two fingers at the same time.
Delete
To delete whilst in handwriting mode, just scribble over the notehead to remove the note completely, or scribble over the individual attached element (e.g. an accent). Alternatively, you can select the item and use the Erase Tool as normal — but that’s not as therapeutic.
Voices
You can write in different voices with handwriting — just select the voice first with the Voice Tool (see below).
Drums / percussion
Writing is also possible for drumset and percussion instruments that use a 5-line staff - on recognition the nearest note/technique/notehead will be entered. For example, if you write a quarter note on the top line of a drumset staff (i.e. for a hi-hat), on recognition it will convert to a crosshead notehead automatically.
Handwriting Recognition Delay
You can adjust the period of time between the writing of the last note and the conversion to digital notation. The conversion delay ranges from 0 seconds (or instantaneous conversion), up to 10 seconds after the period of inactivity has started.
-
Go to Application Menu>Options>Recognition Delay.
-
Adjust the slider and try different levels until you find one that works for you.
Handy Handwriting Hints
-
Zoom in a little if you are having trouble entering notes and symbols accurately.
-
Supported active styli are more accurate than your finger, and as they are pressure sensitive, they feel more like real writing.
-
Experiment with the handwriting timer to suit your own preference.
-
Mix up note entry methods — for example, use your finger or Step Entry to enter notes, then whip out your Apple Pencil to handwrite the articulations. Fender Notion will automatically detect your finger and Apple Pencil and switch modes accordingly.
-
If you are adding notes to a bar that already has existing notes, then Fender Notion will reanalyse the whole bar - this may be fine, but if there are existing elements that are not supported by the handwriting engine (such as grace notes) then these will be ignored and even discarded. In this case it would be better to use another note entry method to avoid having to re-enter these elements.
-
For Grand Staff instruments that use multiple staves for a single instrument (e.g. harp/piano) it’s recommended to draw notes into one staff at a time.
-
Remember —drum, percussion and tablature staves are not supported!
Handwriting diagrams
| Clefs | Barlines / repeats |
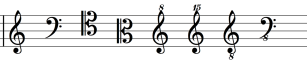
|

|
| Note durations | Chords / Accidentals |
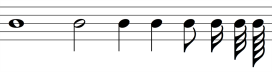
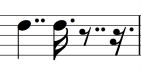
|
|
| Rest durations | Ties / Slurs |
|
|
| Tuplets | Articulations |
|
|
| Time signatures | Ledger lines |
|

|
Voice Tool
You can enter up to four voices per staff in Fender Notion (Voices 3 and 4 are available as part of the Welcome Pack — register for free to unlock it). Notes in all entry methods will default into Voice 1. If you wish to enter in a different voice, tap the Voice Tool — you can access the Voice Tool either in the main palette, or on the left hand side of an onscreen instrument. This will toggle between the last two voices you select for quick switching. To select the other voices, just long press to open the options, or press+swipe+release.
-
You can also choose voices with a keyboard shortcut.
-
For existing notes, you can select the note, and then opt to send it to a specific voice. Open the Context Menu, then choose Tools>Send to Voice X.
-
If you have two voices already written and you want to swap the notes between them, just select the passage, open the Context Menu, then choose Tools>Swap Voices.